Finished Yellow and Grey Guestroom

Finally.  Last night we put the finishing touches on the guest room.  I hope you like what we did. Here are pictures of the finished room.  Final cost $154.63 Click on all the hyperlinks below to go to the projects that we got accomplished. 

One day I am going to actually hit my cost goal, but this is not too bad for a great guest room.  You will see that I added a cute pillow to the bed.  I love the color and graphic.  I got it on Etsy.  The lamps make me happier than the globe lights.  I love them but the chain was too busy for the wall.  I am giving them to Sweet Amanda for the lovebird room.

Remember that it all started with a end table I picked up on the side of the road. I started looking for inspiration to get the table painted.  Then it hit me.  I had a whole room needing love.

Yuck.


I love these owls.
 
Easy Artwork
 
I used a lot of my finds to create a mirror wall.


I tried these lights.
 
But I did not love them in this room.


I like this one so much better.  I found some curtains I can live with. 
 
I hope you like the room.  We are proud of our hard work.
 
 
 WE LOVE IT!  Now bring on the guests.


Milk Glass Lamp

As I have been assembling the supplies for my bedroom make the city house, I ran across a milk glass lamp.  I paid $5.00 for the lamp, shade and all.  It wasn’t in great shape but It will provide me with an opportunity to bring in my milk glass. 

I just wasn’t crazy about the finish on the wood and the faux metal parts were super scratched and tarnished.  The bedroom is going to be gray, yellow, white and black.  I know that the bedside lamp is going to be yellow, so I decided to paint the wood gray and the “metal” (plastic) black. 

Sanded and ready for paint.

Lamps are not complicated.  They are all made from a metal rod with electrical wire running through them connected to a socket.  Any lamp can be taken apart and put back together.  My advice is to take pictures as you go so you can reassemble.  Above you an see all the parts from this lamp.

I really like the gray color. It came from the Garagemahal.  I

I wanted to make the lampshade colorful.  I purchased 1 yard of fabric for $6.00 at Hancock’s Fabric. I took the pleated part of the shade that came with the lamp  off.  There was a smooth plastic shade under the pleating. 

I looked up how to cover a lampshade with fabric.  There were several sites. 
 Here is one of the easiest to follow videos.
I followed the directions exactly as stated.  I drew out the pattern on some gift wrap then cut that out and put the pattern on the fabric.  after I cut out the fabric I sprayed everything with spray adhesive.  Hubby helped hold the lampshade while I smoothed out the fabric.  I touched everything up with hot glue.

I was proud of how it turned out!  I also bought the fabric for the headboard.  $5.00 a yard for  2 1/2 yards of fabric.  $7.50 for a new headboard is not too bad.  I look forward to getting it together.


Making a Work Table

Right now most of my big projects are done on a glass topped patio table. You can see the glass in the picture above from the wood I just varnished. It is a minor miracle that I haven’t shattered the glass on this table top with my projects. Recently my dad gave me the base to an old restaurant table. The base will be perfect because it will move out of the way easily and will be tough enough to stand up to the abuse it is going to take. A tablecloth will cover it when we use it for eating at the garagemahal.  It looked really rusted but it turned out to be surface rust that did not damage the integrity of the metal. I scrubbed everything with a steel brush to get any loose rust and paint off.  My dad thought I needed to get it powder coated.  Sorry Dad but powder coating is EXPENSIVE.  I knew there had to be a better solution.

 . I found some great Rustoleum paint to cover the rust.

This stuff is  magical.  Seriously. It turns the rust places into metal instantly.  The rust spots even feel different after you spray the paint on. Not bad for less than $5.00.

 This is where the rusty spot was before.

 Cast iron base adds weight to the table.

It has a cast iron top plate on top that the wood will be screwed through.

Hubby assembled the top for the table from plywood scraps in the Garagemahal.  The first piece is smaller than the actual top.  After everything was painted on both sides he screwed the two pieces together and attached the table top to the smaller piece of wood.

 I painted everything the same gray color as the cabinets of the Garagemahal.

Now I have a table that can be used inside the garage and out.  It will stand up to the weather and hopefully to my mistreatment.  My dad is getting a matching top for his table base too.

My Husband the Crafter

I went for a walk at the sandy beach on Labor Day weekend.  The rest of the crew made fun of me because I was looking for driftwood.  There was a ton on the beach but nothing that I couldn’t live without.  Lake Livingston is the second largest lake in the great state of Texas. 

It is surrounded by forests.  At the north end of the lake there is a large log jam called the jungle. 
Where there are heavy rains in the Dallas area logs are washed out and into the main part of the lake. We have amazing driftwood where we are at the south end of the lake.  It is light weight, weathered, rounded and is the most beautiful blue-gray color.

Hubby also went for a walk along the beach but he came back with a piece of driftwood.  I asked him what he was going to do with the wood.  He told us that he was going to make a pencil holder for his desk.  My husband is going to make a craft project!  Will wonders ever cease?

Beside being a great carpenter and general handy man he happens to be a fantastic teacher.  The students who are lucky enough to have him for math still talk about him years later.  He does not let students not do work because they come without supplies.  He keeps a set of pencils on his desk for the kids to use because there is no excuse in his class for not doing the work in his classroom. He decided that the driftwood would make a great pencil holder. Drilling just the number of holes needed will allow him to know that the pencils are all returned at the end of class and remind him of his beloved lake.

He drilled 12 holes in the wood that pencils will fit in.

The driftwood he picked was burned at some point.  It really has a lot of character and it is flat on the bottom so that it will stay in place.

Great job, Hubby. 

Making a Key Holder for the Lovebirds

This weekend I got all the things together for the mirror and shelf that we are going to put up in the Lovebird’s nest.  Apparently Sweet Amanda has been busy around her place and has decorated like crazy.  We are going to check out her handiwork this weekend so I should have pictures to post when we return.  When you enter their apartment there is a small space that will serve well as a kind of organization station.  I found the perfect shelf to go under the mirror for $2.00.  I literally did not have to do a thing to the shelf or the mirror. Total cost for these two pieces- $12.00 

See the panel at the top of the mirror that is going to be part of the organization station? Hubby had to cut that off the matching mirror so it would fit on the mud bench.  I used the panel for the key holder.

The shelf was handmade and whoever built it knew what they were doing.  It is solid wood and they even provided the shelf with a cleat to attach it to the wall.  All the metal in the love nest front room is brass or gold.  The former owner  used a gold metallic finish on the shelf.   While I was gathering things to bring home for the entry way organization station, I was also working on the chandelier.  Painting a coat of paint- then waiting for it to dry- repeat.  While the paint was drying on the chandelier, I was puttering.  It occurred to me that the lovebirds might need a place to put keys by the mirror. The key holder could help with where to put the keys and speed up the morning exit.  I searched the hoard and found a drawer front left from the dresser we turned in to a mudroom bench.  It was about the right size, just a little boring. I remembered we saved some parts that we cut off from from the mirror that I had to cut off to put in the mudroom bench.  One of the parts was a wood insert that looked like it would fit perfectly on top of the drawer front.

 I had Hubby nail the two pieces together, I liquid sanded the whole thing. 

Then I primed and painted the thing coral.


 I glazed it at the same time I glazed the chandelier to make them blend.

 This week I ran by Walmart in the dark of morning and got some brass hooks and some little brass medallions to put behind the hooks. Total cost for the materials: $2. 87


Hubby and I laid out the hooks to see how it was going to work. 
 
This piece will be made from an oak drawer front and a maple insert.  Both pieces are old wood and solid.  Hubby drilled pilot holes in the wood before screwing the hooks in.

Please note Hubby drilling on his lap. I am not sure how many OSHA violations that would be but please do not try this at home!

We were really surprised how cute this turned out.  For just over $14.00 we will be able to put together a cute entry way for the lovebirds.  I can’t wait to get it all put up this weekend. 


I Love a Finished Project- The Purple Frames

I have been telling you all about my wild idea to fill Sweet Amanda’s kitchen space with her favorite color, purple; empty frames.  Sweet Amanda I came up with the idea and sorted through the old frames I had in the garage.   The idea progressed from there.  We thought about her teapots that also deserved to be out on display.  One thing led to another until all the frames were painted.  The Purple Frames was part two of the journey.  Tonight Sweet Amanda and Baby Boy came over to see us… well really to drop off some vintage luggage for a friend to use.

They had a surprise for me.

The frames are up!  I can’t wait to really see it in person.  Apparently she has had Baby Boy busy and I will have some of her projects to show soon.

Here are the finished frames on the wall.  I do love a finished project!

 I love the white shelves in the frames. 

They did a great job getting everything up on the wall.  Sweet Amanda had Baby Boy busy with a hammer, screwdriver, and level.  Great job.

1970’s Mirrors

 A few weeks ago I told you about doing a few pieces to donate for Emma’s Hugs, a charity that helps families of children and critically ill adults with parking at the Houston medical center.  I am still looking for a few pieces to remake, if you have something in your garage you just don’t know what to do with I want it, but I am almost finished with my first project. 

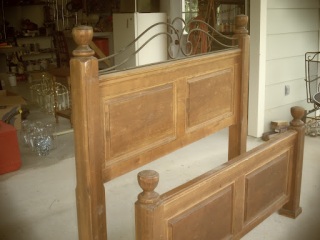
On a recent resale shopping adventure I found 2 1970’s mirrors.  I am not sure what my facination is with early1970’s furniture. It was so over the top.  It could be my age…I had a friend who had parents that had the coolest bedroom set.  My own parents bought their furniture in 1958 and still have it today- some awesome Danish midcentury teak furniture that has sat in the same spot my entire life- but when I was 10 or 11, Gayle Odom’s parents had the coolest bedroom furniture I had ever seen.  It had curves:
 
and color. I was jealous.

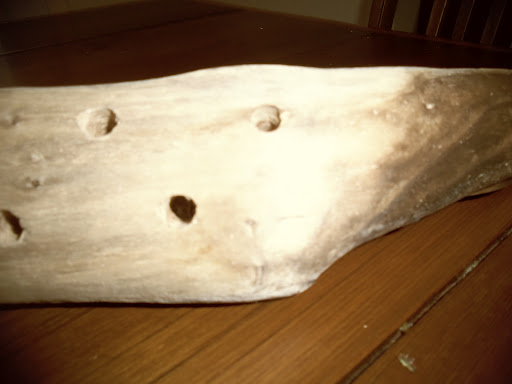
My beauties were outside a resale shop, and were filthy.  I thought they looked like what the evil stepmother in Snow White would talk to by their shape.  They were dark brown, scratched and in general just nasty.  I cleaned them, used liquid sand, and primed them. 

The looked better already.

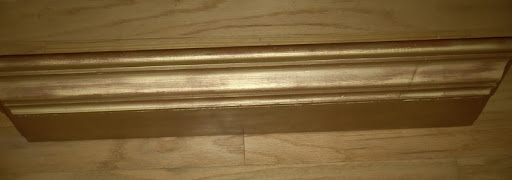
Sweet Amanda and one of her buddies, Beth were up at Star Hill the weekend that the loot arrived so I had input from them on the color.  Beth wanted me to add some metallic sparkle.  I started by painted them my new favorite off white color- Behr Cinnamon Cake.  It has just enough brown in it that it is a warm white color.  I finished them Sunday afternoon.

I had to leave for work at this point so the frames sat on the floor of the Garagemahal all week waiting to be finished.  If you read about my craft table you know that all did not go well this weekend but I could bring the frames in to the AIR CONDITIONED house and work on them, so I did. 

I tried making my own glaze this time.  I bought glazing medium at Home Depot and a charcoal color called Amazon Stone.  1 cup of glaze to 1/4 cup paint.  I am much happier with this than commercial glazes that come colored.  They all dried way too fast for a beginner to work with so I had a lot of clean up.  Make sure to have lots of clean rags.  You are going to need them along with foam brushes.

It is really scary to put the glaze on, but remember that you can wash it off if you hate it.
This is the look after a lot of wiping.
The next step was adding the metallic sheen.  I have used Martha Stewart’s polished silver before but never on such a big project.  I wanted to practice with this one because this is what the Southern Belle wants the huge mirror I found to be done with for her bedroom.

I loved how the frames turned out.  Hubby needs to make new backs for the frames, I will reassemble the mirrors, then they will be done.  I have decided that in order for you to get the frames and the tax deduction I would like you to make your donation directly to Emma’s Hugs then print your donation reciept.  I would like for Emma’s Hugs to get at least $50.00 for the pair or $30.00 each.  It will be at least two weeks before we are totally finished with them, but I think they are going to look great. Send me a message if you want one or both of them.
I just couldn’t part with both of them. Remember I told you I love 70’s: Here is the one I kept on a mirror wall in my guest room.


Mirror Mirror

I admit that I have a thing for old mirrors.  I really love the aged quality and light that they bring to a home.  On a recent resale shopping trip a mirror spoke to me, as mirrors often do.  It was rough.  At one time this mirror had been a beauty.  In the beginning I believe it was a gold plaster frame with some sort of decoration at the top.  It was hanging on a wall in the resale shop for $5.00  The mirror was scratched and one of the plaster roses was broken.  Someone had tried to fill in with wood filler where the top portion had been.  I had to have it.  After some negotiation I got the mirror for $2.00 and brought it to the Garagemahal for a make-over.  The first thing I did was try to repair the scratch on the mirror silvering.  I don’t mind aging mirrors but this one had been scratched and left a streak across the glass where there was no mirror silver left.  I used Krylon Looking Glass paint.

It took several coats and it is still not perfect, but the scratch is not as noticable as before. 

I taped off the glass front of the mirror with blue tape carefully because I knew that even the blue tape would possibly take off more plaster.  I then covered the rest of the glass with newspaper.

After I covered everything with newspaper I sprayed clear satin sealer on the frame.  It was so fragile that I thought the thing would fall apart if I tried anything before I sealed it.

Next I gave the whole thing two coats of shiny gold paint. 

It looked better already.

Because I really did want to return the mirror to its aged appearance I used glaze mixed with a dark brown color to glaze the entire thing.  I let it set on the frame a lot longer than I normally do because I wanted to make sure I knocked down the shiny gold.

The frame is very fragile so I sprayed everything front and back with a spray sealer.  The plaster frame cannot afford to absorb any more moisture.  In our humid location I knew it would need all the help it could get.

I love the vintage quality of this frame in my bedroom.


My Weekend Finds- Saving the Best for Last

We have been busy at Star Hill lately.  All this activity means that the hoard was getting pretty thin.  Also, we have used up a lot of our left over supplies.  We are even almost out of furniture to repurpse. Because I know I have a problem with buying more than we can do, I limit myself on weekends we go searching  to $50.00. I have been looking for a headboard and foot board to turn into a bench.  I didn’t want to spend a lot on this our first attempt in case it goes horribly wrong.  I spotted one on Kingwood Garage Sales that was perfect for the project and was only $25.00.  On the way up to Star Hill we made stop number one.  I love it. 

Saturday morning bright and early we made a list of everything we were out of or needed for our projects then headed toward Huntsville. I am so proud.  I did not ask Hubby to pull into a garage sale one time on the way there.  It was a good thing too because we were really out of a lot of stuff.  Our bill at Home Depot was almost $200.00. Plywood, paint, primer, beadboard, brushes… the list was pretty long.
On the way back, can you believe that Hubby suggested we stop at a few garage sales?  It was a great morning! 
At stop number one I got two fun 1970’s mirrors that reminded me of Snow White’s “Mirror mirror” and a great corner desk for me to use as a craft corner in the garagemahal.  $10.00 for the mirrors,  $15.00 for the desk.  Weekend budget shot.

 I should have warned you that the corner desk is lime green with blue and purple dots.

Feeling really broke we headed for home.  Hubby spotted another garage sale sign that was made out of a cardboard box.  He said we had to check out this last one on the way home.  We pulled up to a metal building that did not look like a house at all.  A sweet young couple are living in a shop with their little one but they are moving so they were selling everything.  Nothing really caught my eye until I got to the back of the building.  There it was… the find of the weekend. 
It was gold…
marked $10.00
And I loved it.  Hubby reminded me I have enough mirrors.  I looked at him like he was crazy and said only four words.  Put- it- in- the- truck.
Not sure what I am going to do with this beauty.  I am looking for suggestions.

Turning a Dresser into a Mudroom Entrance Part 1

It was late at night after visiting a friend that I noticed a dresser on the side of the road by the trash.  I begged and pleaded until Hubby pulled over and backed up then reluctantly got out to examine the dresser.  It was solid wood with dovetailed drawers but the back was broken out, along with part of the top.

 The top two drawers were in pieces.  It was perfect!  I had seen a dresser made into a bench on my favorite site, Pinterest, and I was on the lookout for just such a piece. One of the blogs that I now follow has great ideas for repurposing old furniture: My Repurposed Life.
http://pinterest.com/pin/168814686002517379/
Pinned Image
 We loaded the dresser into the truck and headed home.  Exactly one of us was very happy.  It got delivered to Star Hill the next weekend and I let it sit for a few weeks without talking about it to Hubby.  I have learned over the last 30 years to let him get used to my ideas before jumping in full force.  As the dresser sat there I started thinking that I would like a mudroom piece for our front entrance instead of just a bench.  I wanted a place sit and take off dirty shoes, a place to hang coats and hats and storage for umbrellas, scarves, gloves (for our two week long winter) and garden shoes.  Those things tend to congregate in our entrance and looking at them scattered across the floor makes me crabby.  I started looking for inspiration on Pinterest and found one that would be perfect.  My favorite is from Simply Seleta’s blog. I could use the dresser!
http://pinterest.com/pin/168814686002130703/
Pinned Image
 I printed several pictures for Hubby to see.  Another thing that I have learned is that he handles my crazy ideas better if he can see the item that I want.  We took measurements of the dresser and I drew out what I wanted it to look like.  The next step was to start looking for the parts.  I knew I wanted a mirror for the back of the piece. There is already a mirror in our entry way and I like being able to check myself before facing the world.  I also knew that I wanted the drawers to have crystal knobs.  No reason for that except I wanted them.  I found the mirror in a resale shop along with a twin that is an entry way piece for the lovebirds’ home.  I got the pair for $20.00.  Sad to say our mirror is going to be cut down and the decorative moulding removed.  It is a beautiful solid wood maple frame and super heavy but it needs to be plain for the piece.  The crystal knobs were in a Huntsville antique shop. 
 I hate to tell you that I paid $3.00 per knob for the four but they were exactly what I wanted.

It was the end of summer season so I was able to get an outdoor cushion on clearance.  The piece is going to be inside the house but remember that I want it for Hubby to use when he comes in from the yard… gross.  The color of the clearance cushion determined the color of the paint.  I loved the color that I found and when I read the name I knew it would be perfect.  Valspar ar1428- Man Cave! http://www.valsparpaint.com/en/explore-colors/index.html

I modified a picture from This Old House Website so that Hubby could see what I was going for.

No lift up lids at the bottom.  Drawers will be used there from the original dresser section.  The top will have false drawer fronts that just lift up to jam stuff in.  http://www.thisoldhouse.com/toh/how-to/intro/0,,20301255,00.html
The instructions at this site are amazing.  If you are wanting to make something this is definitely the site to look at along with http://ana-white.com/
Both sites have just about any build it yourself project ever thought of.
The first thing that I did was to get the four drawer fronts I will be using on the project ready by filling in the holes from the old hardware.  There was no hardware on the dresser when we rescued it but whatever had been there was loose and has torn up the front of the drawers.  It took three coats of wood filler, sanding between the coats to get the drawer fronts smooth.  I worked on the drawers while waiting for some of my other projects in the Garagemahal to dry. I did not need Hubby for wood filler so this is still part of his getting used to the idea time.  Remember he is not yet in love with my project… but he is warming up to it… I think.